Yellow Schedule Support
Add live bookings to my website
How do I add live bookings to my website?
1) Switch on the Booking System
When logged in go to:
– Settings (top right menu)
– Online Booking Setup.
– Switch the website booking system to “ON”.
– If there’s multiple users (or staff) on the same account you can switch individual users on who need to be able to take bookings from your website.

2) Place the booking widget on your website
Option A If you are using WordPress, Joomla or Drupal we have plugins for each of these to make this step easy. See the pages for WordPress Plugin, Joomla Extension and Drupal Module.
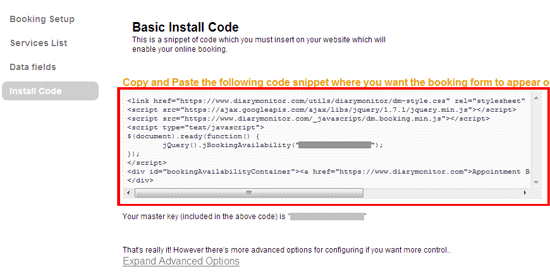
Option B If you are adding the booking widget to your own website (and are not using one of the plugins above) you can paste a snippet of HTML code into your website source. To get the html code go to:
– Settings.
– Install Code
– Copy the snippet of code paste it into your website source where you want the widget to appear.
(If you are using a YellowSchedule Microsite as your website the widget will automatically show up)
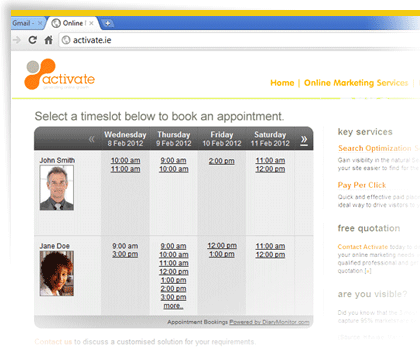
Your website should now be displaying your available slots and your clients can book appointments directly with you. We have some controls for advanced users if you wish to tinker with the way widget looks (if not then you can ignore the section immediately below)
For advanced users, if you want tinker with the way the widget looks there are a few options available. These are visible under “advanced options”. Options in here allow you to:
– changing the number of days which display and as such allow you to control the width of the booking widget box.
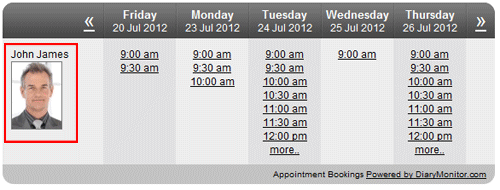
– show/hide the users name & image on the booking form.
– show or hide booking links – this is important if you would like to show your customers when you are available but do not want them to be able to book themselves in.
– you can only show a single user. Useful if you need to show single user availability for each of your users for example if you have a staff page on your website and want to list each staff members schedule.
– stay in same page. Will prevent the booking process from opening a new browser tab.
3) Setup
Setting up your Working hours:
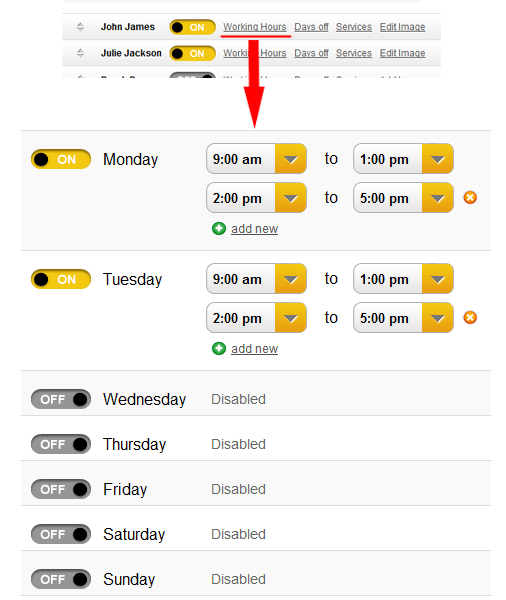
You should set the days and hours that you are available to take bookings. You can switch on extra days such as Saturday and sunday, or switch off days during the week if neccessary. Also you should set the times which you are available to work. If you do not wish to show lunch hours then you should make sure that these are excluded here.
(The screenshot above shows working hours Monday and Tuesday of 9:00am-1:00 and 2:00-5:00pm)
Working hours are added on a per users basis. So different users may have different working hours.
Days off:
If you don’t want clients to book with you during times you are away then each user can set their days off. Days off can be set as annually recurring – eg for Christmas or new year. Alternatively you can just create a blank appointment in your calendar to prevent it being booked by a client.
Services:
If you wish your customers to select a particular service when they place a booking then you can setup services.
To do this go to:
– Settings
– Services List
You can now add new services.
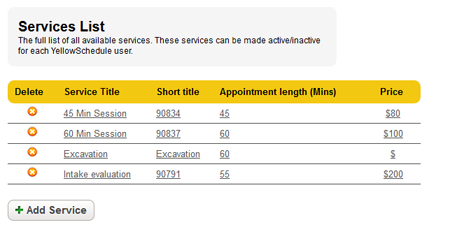
When adding a new service. The service title will be visible to customers when booking. The short title will only be visible to you after a customer has made a booking.
The appointment duration must be entered.
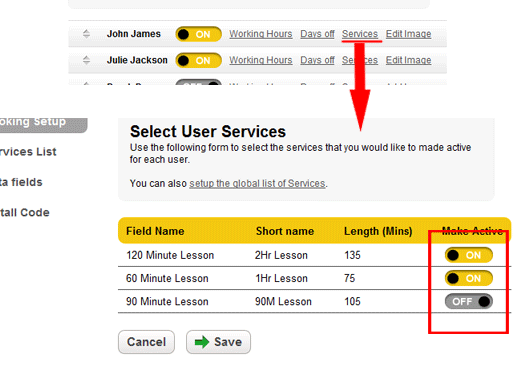
Where there’s multiple staff you can individually set which services each user can perform. To do this:
1) Click on “Services” in the user list.
2) And switch on the services for the user.
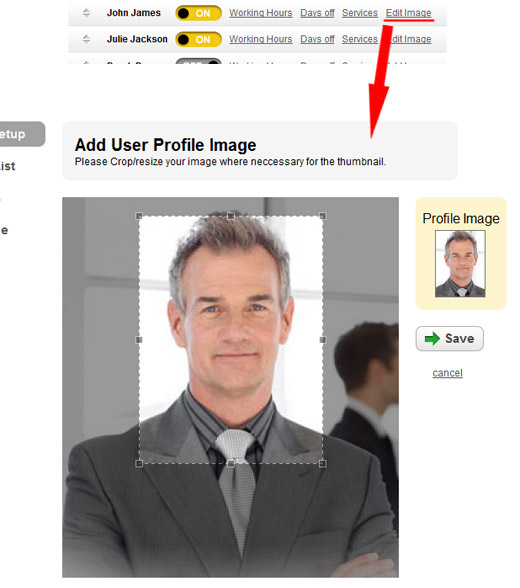
Add image:
Make sure you a profile image. This is displayed in the booking widget. Businesses using profile images receive a much greater number of client bookings as clients are more likely to place a booking when the can see who it’s with. To add a profile image:
1) Click on “Add Image” in the user list.
2) Find the image to be used and click on upload.
3) You can crop the image to the correct shape and size. When this is done click on “Save” to complete this step.
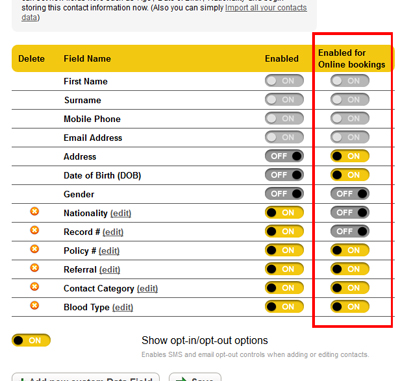
Data Fields:
There is another help guide detailing how to set up custom data fields for your contacts. You should switch on the option for “Enable for Online Bookings” if you would like clients to have to enter the custom field details when they make a booking.
1) To do this you must have already created the custom fields (as outlined in the link above).
2) Click into “Settings”.
3) Switch ON the option for “Enabled for Online Bookings” beside the new data field that you want your clients to have to enter when they make a booking.
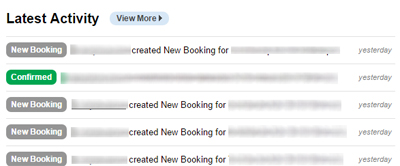
New Bookings
You should begin to see new bookings coming into your dashboard. You will be notified by email when there’s a booking (also we recommend using our Mobile App as you will receive push notifications to your smartphone when there’s a new booking through your website). Please Contact Us if you need any further help setting up live bookings on your website.