Yellow Schedule Product Updates
Approve or Decline client bookings
Posted on September 6, 2017 by Michael
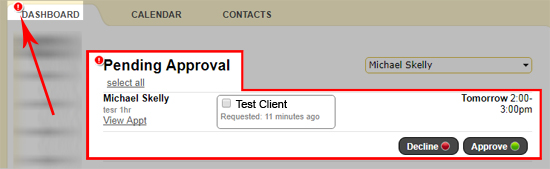
We’ve added a new feature to allow client bookings to be screened before they are accepted. With this option enabled you will need to Approve or Decline each new client booking on a case by case basis.
When this mode is switched on. Each new client booking must be approved or declined. You’ll be notified by email when you need to make a decision. You’ll also see an indication on the dashboard that new bookings require your approval.
To switch this option on go to:
– “Settings” (top right menu)
– “Online Booking Setup”
– Under the heading “For new bookings do you want to:” select the option for “Review each booking request from clients and Accept or Decline each one”
After Approving (or Declining) a booking you’ll have an option of notifying the client via text message.
Minor dashboard and booking updates
Posted on August 22, 2017 by Michael
We’ve made some updates to the system to improve the speed of display of the dashboard.

We’ve also put in place an update to the booking system to improve the responsiveness of the booking widget as it on mobile screens. This ensures that on smaller resolution devices the widget will display in a cleaner, narrower profile making it easier for your client to book their slot. We will be releasing major functionality and responsiveness updates to the booking system over the coming weeks.
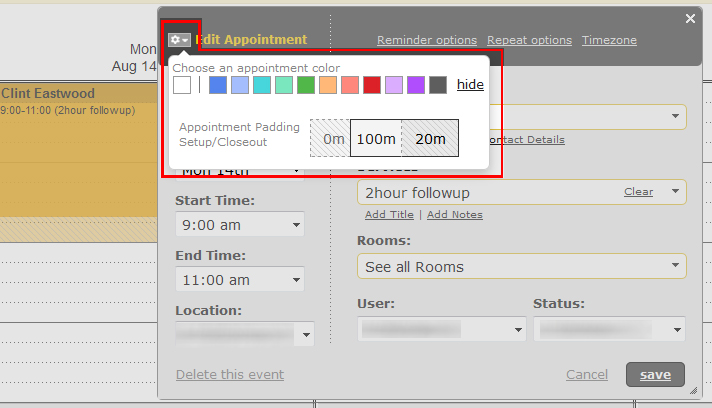
Updates to appointment services
Posted on August 2, 2017 by Michael
We’ve made updates to appointment services to give extra control to users.
We’ve added the ability to fine-tune the duration of services. Users can add padding at the beginning or end of an appointment for administrative time used to Setup or Closeout the appointment.
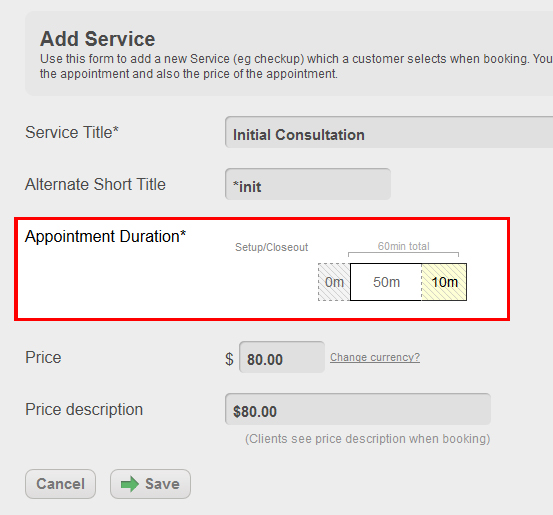
Services duration can be fine-tuned by going to “Settings” (top right menu) >> “Services List”.
Additionally when creating/editing an appointment picking the service will automatically set the appointment duration.
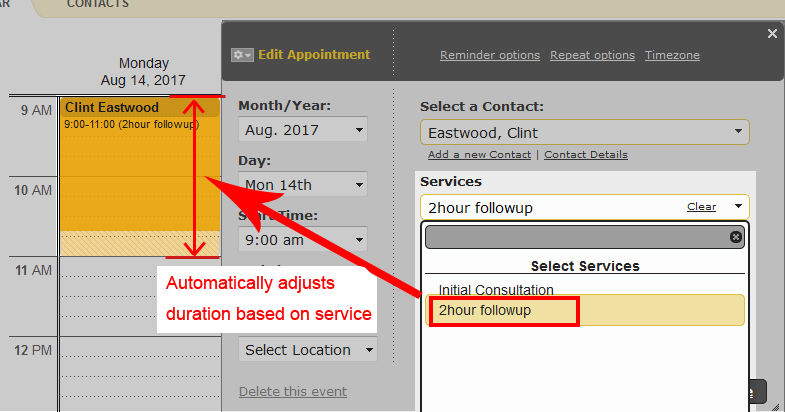
It’s also possible to adjust padding/duration on individual appointments on a case by case basis which may be useful if you need to override a particular service’s default settings.
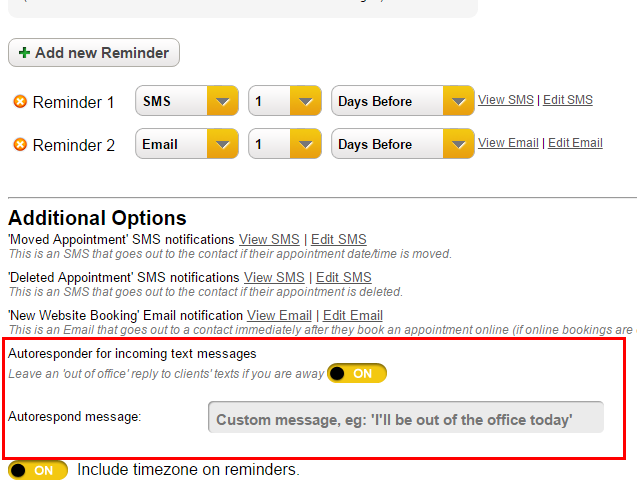
Vacation SMS Auto responder
Posted on July 11, 2017 by Martina
We’ve added an SMS auto-responder function for vacation/out of office time. When clients message you while you are away you can set an automated custom response to let them know you’re away from the office.
To set it up go to Settings > Reminder Settings. At the end of this page you can toggle on an auto-responder for incoming SMS messages and customize with a short message.
Remember to turn it off when you’re back in the office!
Calendar Sync and HIPAA Compliance
Posted on April 5, 2017 by Michael
Storing patient data in the cloud? YellowSchedule is designed to HIPAA specifications and we’ve put a great deal of effort into ensuring data security and privacy. YellowSchedule allows you to be HIPAA compliant, but you still need to be careful. Particularly if you are syncing data with different tools which are outside of our control.

(Are you syncing PII data to Google/Outlook?)
Many of our customers choose to sync their calendar with tools such as Google Calendar or Outlook. We have excellent integrations with these systems. But there are synchronisation idiosyncrasies that could mean some of your client names could be synced with a google or outlook tool that’s not covered by a Google or Microsoft HIPAA Business Associate Agreement.
Since 2013 google has calendar services for Health Care Professionals on which they are willing to sign a HIPAA business associate agreement on. They will not sign a BAA on the standard version of Google (ie: the non-paid accounts). Similarly, with outlook there is a paid version of Office 365 for health on which microsoft are willing to sign a BAA on but the standard version they will not. If you are syncing with these tools and using the “Healthcare” version covered by either Google or Microsoft there is no problem.
If you are not using the paid versions of these tools you can still sync with them in a HIPAA compliant manner. When creating the sync within our system you should use the option for “Don’t Sync Names” from the Appointment data. Appointments created in YellowSchedule will still have this name, but when they are viewed in Google they will not show the client names. We also have an option to sync and include only the client’s initials as this has been a requested feature but this is option is still technically not HIPAA compliant.

(On the Quickstart Setup under HIPAA options for Google Sync. Use this option if you are bound by HIPAA and you want to sync but don’t have a BAA with the third party Calendar)

Under “Settings” >> “Calendar Sync” (after sync has already been made you can change this settings. Do this if you are bound by HIPAA and you want to sync but don’t have a BAA with the third party Calendar).
The quick rule is if you 1) Wish to sync calendar and 2) Use non-paid version of either google calendar or outlook and 3) Are required to be HIPAA Compliant. Then ensure you select the “Don’t sync names option”.
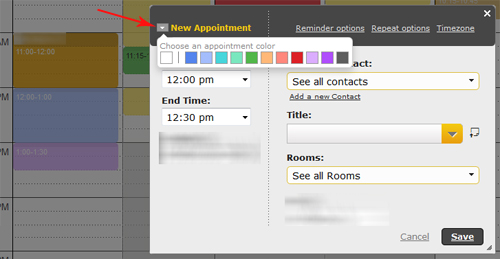
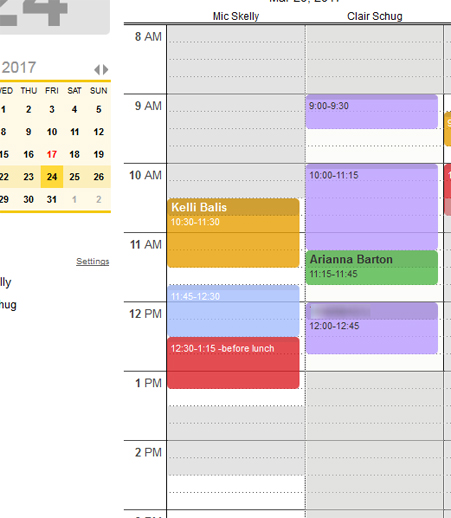
New usability and color options
Posted on March 24, 2017 by Michael
We’ve added some great new features and usability updates to the system.
We’ve added in the ability to be able to set individual colors for appointments.
We’ve also redesigned the user menu left of calendar, to allow you to assign default colors to specific users along with dark or light appointment font color options (The new user menu also gives better control to account administrators in multi-user accounts then before)
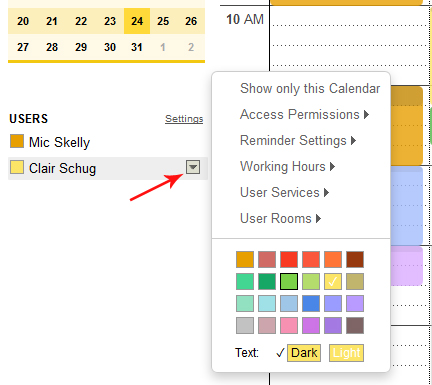
We also included an option to ‘shade-out’ calendar times for outside of normal working hours making it easier for administrators to schedule appointments for staff.
(If you don’t want the shading option it can be disabled from the “Working hours” setup page – simply untick “Shade-out non-working hours in the main calendar” then click save – see how to do this here)
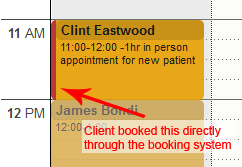
Lastly we also included an easy way to know which appointments were booked directly by clients (if you use our booking system on your website). Direct bookings by clients will have a red left border.
(If you don’t want this feature it can be disabled at “Settings” -> “Online Booking Setup” -> “Highlight client booked apts with a red border”)
HIPAA Compliant File Storage
Posted on January 17, 2017 by Craig
You asked and we delivered; the ability to upload client documents in a safe, secure and HIPAA compliant location.
How to enable the new File Storage feature?
1) Click on “Settings”
2) Go to “Billing Summary” where you will see the following:
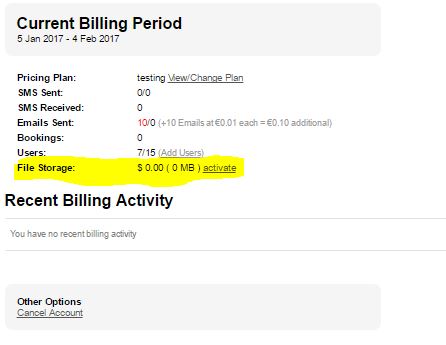
3) Note the new option for “File Storage” as highlighted above. Click “activate”, where you will then be asked to choose the amount of storage that you need.
**Plans starts at $5 per month for 500MB of storage. All files are encrypted in transit, stored encrypted at rest and are backed up and safe when they are on our system.
How do I start Uploading Client Documents?
File storage is found under each contact/client. To upload files relating to certain clients all you need to do is the following:
1) Go to your contacts list and select the contact that you would like to upload files to.
2) Under the contact information you will find the new file storage feature as shown below:
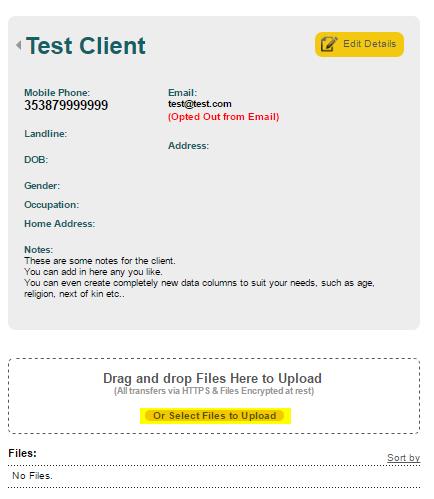
Files can be dragged and dropped into the boxed area, or select files from your computer by clicking on the option highlighted in Yellow above.
Once uploaded, the files will appear as so:
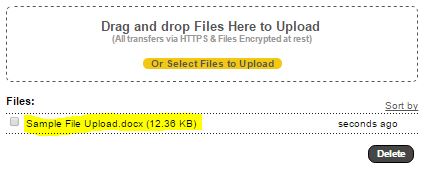
The file can be downloaded at a later stage by simply clicking on it.
File storage is one of many system updates that will be coming your way in 2017, so watch this space!
If you have any questions or feedback on this new feature, don’t hesitate to get in touch by emailing info@yellowschedule.com
System Updates
Posted on May 5, 2016 by Michael
We are constantly improving our system based on your user feedback. Here’s a few recent updates to make Scheduling with us as easy as possible.
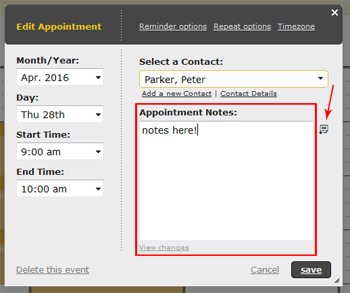
1) Improved client note taking.
We have introduced the ability to keep appointment or session notes for clients. These can be viewed by clicking the notes icon. Full audit trails of when and who edited these notes are available. (As with all clients details, notes are secured with highly advanced encryption techniques).
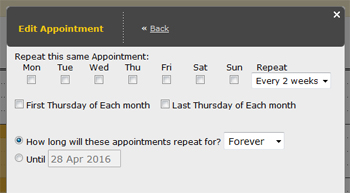
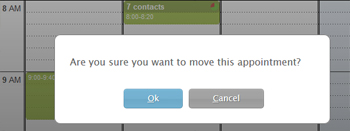
2) Repeating appointment improvements.
We have overhauled our repeating appointments functionality. Repeating appointment options can now be edited as needed. Also repeating appointments can be repeated “forever” now.
3) Improvements to navigation throughout the system.
We have made some subtle additions to allow experienced users to more quickly navigate through to the areas they need more quickly.

4) Improvements to Calendar Printing.
We recently wrote up a new blog post about this. See more on YellowSchedule Goes Green!.
5) New interactive user help guides.
We introduced improvements to our help system to include new interactive user help guides. These tutorials make it easy for new users to quickly learn the ropes.
6) Updated user messaging.
We updated all user messaging to be clearer and more intuitive to users.
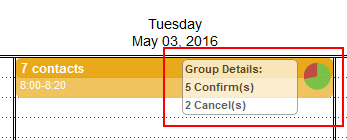
7) Updated display of Group Appointments
We included a version our unique green/red dot system for group appointments. If you take group appointments you can now see at a glance client confirmation and cancellation details for appointments directly on your calendar.
It wouldn’t be possible to have a system this powerful without the support of our excellent customers. We continue to welcome feedback from customers and are already excited whats in store for the next set of updates.
YellowSchedule Goes Green! (kind of)
Posted on April 9, 2016 by Michael
We’ve made some major improvements to the printing of schedules. We’ve updated printing of the calendar to only show the calendar and appointments and to remove unnecessary user interface elements from being sent to the printer as these were just complicating the final printout and using up extra paper! Your feedback suggested we needed to cut back on what was actually been printed. The result is a much cleaner print now with no more wasted paper.
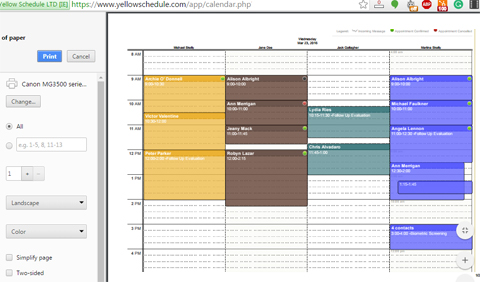
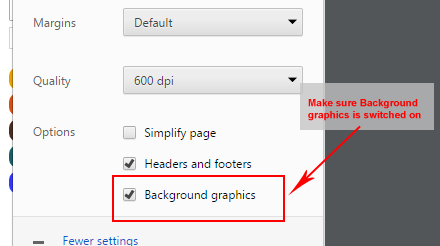
We still recommend you to click the “Print background colors and images” option (“Print background Graphics” under chrome) so that appointments will appear clearer when printing. Also we recommend printing in landscape mode to reduce paper usage.
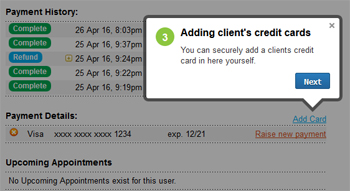
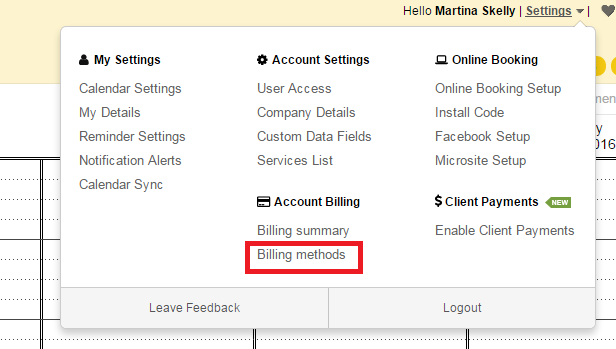
How to Add Your Credit Card
Posted on January 26, 2016 by Martina
To continue with YellowSchedule after the 14 day free trial is over you’ll need to add your credit card for the monthly subscription fee.
Simply go to the Settings menu in the top right of the screen and navigate to ‘Billing Methods as highlighted in the screenshot below.
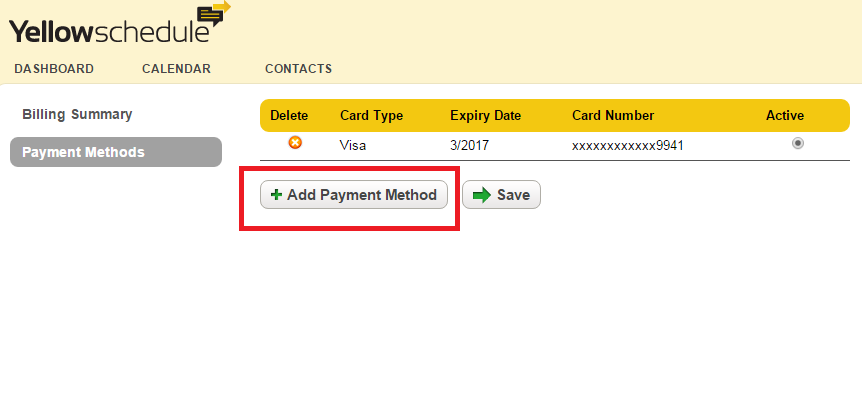
Next click on the + Add Payment Method button as below.
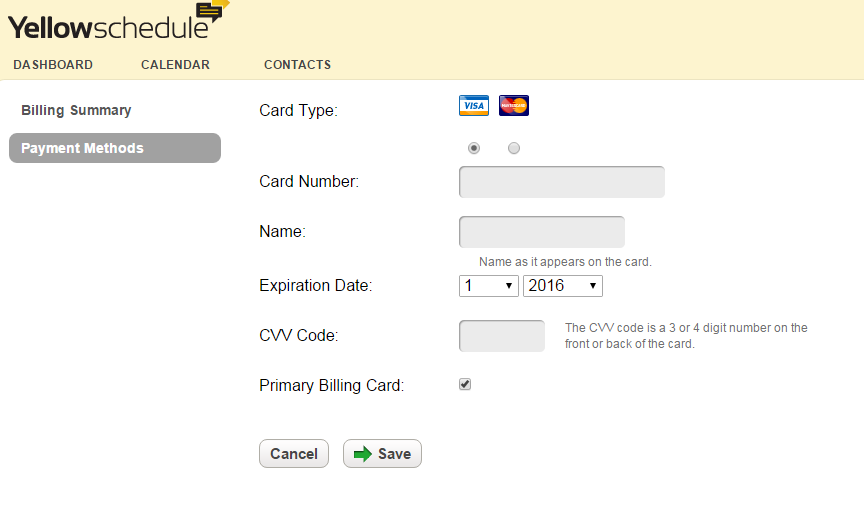
 You then need to enter your credit card details in the blank fields and click the Save button when you are finished.
Your card will be automatically billed each month. You’re not tied down to a contract term with YellowSchedule, you can cancel your account or upgrade/downgrade at any point.